Showing posts with label Mod Podge. Show all posts

11.06.2013

Wednesday Redo: Wooden Puzzle

Ugh. So smart.
I love this.


Find out how Michelle did it over at Rust & Sunshine.

Pin It Now!

7.10.2013

Wednesday Redo: $1 Shelf Makeover

If you do any sort of thrifting, then you're bound to run across a shelf or two. It's pretty amazing all the different shapes and styles that are out there...and it would certainly be difficult to pass up a one dollar price tag.


Check out how Kimberly did it at seriously daisies.

Pin It Now!

7.01.2013

A Summer Mantel


Gosh, I can't believe it's already been over a year since I mod podged this photo. In fact, she was still one at that point...
Man, time is flying by way too quickly in this house.


That old fence you see back there is straight off the beach and given to me by my sweet friend, MK. Somehow she knew I'd love it. :)


Goodness knows, how could I not? It screams summer, and I do love the summer...


...not to mention ice cream.

Pin It Now!

6.26.2013

Wednesday Redo: Decoupaged Lace


What a grand idea. Simple. Sweet. Cheap.
Get all of Suzonne's details over at Urban Comfort.

Pin It Now!

6.17.2013

Super Easy Father's Day Idea


I do apologize I couldn't get this to you before Father's Day...but if I would have done that, it wouldn't have been much of a surprise...

I wanted to do something different...rather than the same old, boring picture in a frame. So, I decided to Mod Podge it on a piece of wood instead. (Pretty manly, right?)

After the home improvement store cut my piece of wood for me, I stained it a shade or two darker.
 

Next, I printed out a little sentence Ross revealed to me about Grady and Mod Podged that on to the photo.


And, lastly, I Mod Podged the photo on to the stained wood.


Super easy, yet super sweet.
He is one great dad, I might add...


Pin It Now!

6.12.2013

Wednesday Redo: A Dollhouse Shelf

So, I'm on a dollhouse kick this week...
But, goodness. How can I not be...when this $1.50 thrift find...


later became a little girls dream!?!?!


Check out all of Jessica's details at Dear Emmeline.

Pin It Now!

1.23.2013

Wednesday Redo: Thrifted Suitcases

I've been itching to do this for a while. 
They're JUST too cute not to!!


Find out exactly how Rachel did it via A Beautiful Mess.

Pin It Now!

1.11.2013

Dollhouse Details: The Kitchen


If you remember from the last post, most of the furniture in the dollhouse came from the thrift store...all of which looked similar to this...


In the kitchen, however, I decided to do a lot of redoing.
For the table I painted the legs white and simply mod podged scrapbook paper on the top.


I painted the kitchen sink, fridge and cabinet white with a black top (in the hopes of resembling a counter top). The chairs and china cabinet were painted aqua and distressed a bit.


The little plates, I bought from Hobby Lobby and outlined with a gold paint pen.
The letter "M" is a magnet I just happened to have.
And the wallpaper is actually wrapping paper from Target that I attached with spray adhesive. (Word to the wise, however; the thicker the paper, the easier the application!)


Check out the whole dollhouse HERE.

Pin It Now!

6.25.2012

Shadow Box to Picture Frame


I found this old shadow box a while ago at the thrift store and thought it might fun to change it up a bit...and give it as a gift.


I sprayed it white and sanded it down.


Since I marked this particular find for Annie, I blew up one of her favorite photos...


and cut it to fill the holes.


Using Mod Podge, I simply glued each piece inside.


It now hangs in her living room...


along with a couple family mementos. Pin It Now!

4.01.2012

Mod Podge a Poster

Well, the final preparations for the party are underway...
I chose to use a blown-up picture (poster) as the main display for Ross's (ice cream) party.
This is what I did...

Step 1: Get a photo blown-up to poster size (I did this at Office Depot for around $20) as well as a cut piece of plywood (from Lowes or Home Depot for $10...and you'll get A LOT of extra wood for future projects). You'll need to measure the size of your photo and get your plywood cut 1/2 to 1 inch larger for each measurement.


Step 2: Spray paint your plywood a corresponding color to your photo. I chose black simply because I put a black vignette around mine when editing the photo.

Step 3: Trim the white edges of your poster. (However, you could have painted the plywood white, and left the white edges...)


Step 4: Paint Mod Podge on both your plywood and the back of your poster.


Step 5: Using a roller of some kind (a rolling pin would work well too), roll out any air bubbles. I found that it helped to start in the middle and roll out.


Step 6: Paint Mod Podge over the entire thing. I did 2 coats.


And after it dries...this is what it should look like.


I'm dying to get it up at the party!


Linked up to: (Sunday) Nifty Thrifty Things, C.R.A.F.T., The Girl Creative, Homemaker on a Dime, Everything Under the Moon, Craftomaniac, Lines Across my FaceThe Delectable Home, It's Overflowing, Making the World Cuter, Flour Me with Love (Monday) Burlap & Denim (Tuesday) Domestically SpeakingChef-in-Training, Sugarbee Crafts, Sassy Sites, Not Just a Housewife, A Diamond in the StuffNatural Nesters, Clean & Scentisible,  Uncommon, Fox Hollow Cottage, Housewives of Riverton, The Winthrop Chronicles (Wednesday) Blue Cricket Design, 733, Southern Lovely, Someday Crafts, Chatty Chics, Crafty Scappy Happy, Beyond the Picket Fence, Live, Laugh, Rowe (Thursday) Naptime Crafters52 Mantels, Simply Designing, Design Dazzle, See Vanessa Craft, (Friday) Bacon Time, Finding FabulousTatertots & JelloFunky Junk (Saturday) Six Sister's Stuff, A Little Inspiration, Too Much Time on My Hands, Thrifty Decor Chick Pin It Now!

12.26.2011

For the Bride & Groom

Two of our good friends are getting married this May . . . on Cinco de Mayo, in fact!  So a few friends and family got together over the holidays and threw them a little shower.  My mother-in-law (a.k.a. "Annie") came up with the most fun idea for their gift . . .

We started with a large piece of painted plywood.

Using Word, we printed out the number "5" (the month and day of the wedding).

I put the cut out "5" on an overhead projector and traced the projected "5" on the plywood.

Then, we cut out and glued photos of the couple inside the traced "5."
Once it was done, we painted the entire piece of plywood with Mod Podge.


The final product came out looking like this.


I'll confess, I'm a bit jealous I don't have one for myself.


Linked up to: Nifty Thrifty Things, C.R.A.F.T. , Homemaker on a Dime, Making the World Cuter, Everything Under the Moon, The Girl Creative, Lines Across my Face, Centsational GirlSassy Sites, A La ModeChef in Training, Not Just a Housewife, Sugarbee CraftsThe Thrifty Home, JAQS StudioBlue Cricket Design, Uncommon, Clean & ScentsibleOrganize & Decorate Everything, Someday Crafts, Bacon TimeSouthern Lovely, 733, The Artsy Girl ConnectionHouse of Hepworths, Mess for Less, Saved By Love CreationsBetween U and Me, The Shabby Creek Cottage, The Crafty Nest, Sassy Sites, Finding Fabulous, Nifty Thrifty Things, Everything Under the Moon, Design Dazzle, Ninth & Bird, Funky Junk Interiors, Too Much Time On My Hands, Tatertots & Jello Pin It Now!

11.22.2011

Blog Post Trade-Off: Everyday Lovely

I'm thrilled to have Cailan here today from Everyday Lovely.  If you haven't been to her beautiful blog yet, then there's no doubt you'll be convinced to today!


Hello! I'm Cailan from Everyday Lovely, and I'm positively delighted to be over here at adorable Holly's cheerful, thrify-fun blog. :)
Today, I'm going to share an idea for an quick,
inexpensive {and lovely!} Christmas gift, you can make yourself:
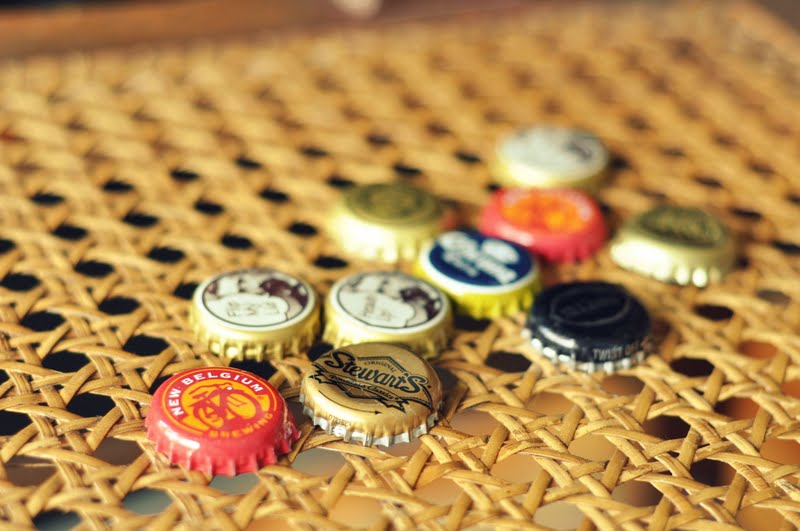
Numbered Bottle Cap Magnets.  

First, gather yourself a little collection of bottle caps, enlisting helpfully thirsty people to contribute for a few weeks until you have 10.
 
Then, sort through the microsoft fonts and decided on one you like.  I liked SimSun-ExtB for it's simplicity.  I printed several out, trying to get the right size and in the end used some numbers in size 62 and some in 49ish for extra-fun variety.
At this point it would be handy to have some sort of crafty circle punch, but I have nothing anywhere near that nifty, so I just eye-balled and cut and trimmed a circle that fit and then used that as I guide for the others.
 Then, get out your Mod Podge and the whatever paintbrush you can find in  kiddos' craft cupboard.
 Brush some Mod Podge on the bottom of the cap, put the number in and then coat the top.
 Then hot-glue these heavy-duty magnets from Walmart to the backs.
At this point, I decided they looked a bit too crisp and white, so I got out some Old English furniture polish.
Added a bit of the polish to my glue plate, brushed a coat of it on top of the dried Mod Podge, and wiped it mostly off with a paper towel.  You could add a coat of resin at this point, but that would add to the cost and mine have held up perfectly peachily for months now.
So here they are:  sweet-little-antiqued-numbered-bottle-cap-magnets.
And really, since I already had the Mod Podge and furniture polish, the only cost was the magnets, which were $6 for 50/ $1.20 for the 10 I used - woohoo.

Guaranteed to make your friend's fridge {or cute chalkboard!} 
feel extra-special-pretty. 
You can find more easy-peasy Tutorials and ideas for lovely everyday living at my little blog Everyday Lovely.
Thank you very much for having me, Holly!
Pin It Now!